June 29, 2017

R0-D4 dome upgrade 2017 - 1.2

Finished off attaching the location blocks.

Glued and then screwed from the underside.

Once these were all done, I re-attached this new base ring to the Dome.

One thing I didn't get round to doing on R0's dome was his two side rear quarter panels. I wanted them to be blue, but didn't have time to do this before going to Celebration Europe 2016. Whilst there R5 was in much demand that I didn't get around to swapping over the domes and driving R0-D4 around. Then once home, he was put back on the shelf (dome) and I forgot about the panels.

So I decided to spray them up. Using a strong clear bag, I masked off the two sections.


Next up was spraying them with metallic blue.

And whilst I had time, I did some light weathering to the dome to better match-up with R5's body. Didn't want to go mad as this dome may not of seen sand lol, but still needed to be grubbed up a bit.
 The top has had the weathering toned back a bit since this photo.
I may put on my list of things to do, a set of correct dome rods.


~~~~~
Went and ordered the new metal strip that will be used to make up the new skin ring, which will replace the original wood one.
Ordered on Monday 26th from:

Metals4U (here in the UK),

they supply cut to length/thickness/width from a range of materials.
It arrived the next day!! WOW!!


June 23, 2017

R0-D4 dome upgrade 2017 - 1.1

Measured and cut out the ring yesterday. Then marked up where the bearing location studs will go, in relation to the domes skeleton frame work.
And here it & R0's dome, next to R5's dome, for ref work on how I did it etc. Next up was to mark out the recessed parts for the studs.
And then I drilled and countersunk the holes used to fix the new ring to the skeleton frame.

~~~~~~~~~

Next up was to make the stud location blocks. These are thicker than the base ring and help locate the dome securely onto the bearing. I marked the skeleton frame position onto the base ring and then cut out some blocks from 18mm thick plywood. Once I had the position of the stud marked, I drilled out a slightly larger hole so there is clearance allowing for misalignment with the studs. I then placed the ring on the bearing, and using the studs as a guide, I glued the blocks into place.
I did these one at a time. Once the glue was dried, I then drilled and screwed the blocks in place.

Here's the view from inside the dome.
Once these are all in, I then need to look at the new metal neck skin.....

June 20, 2017

R0-D4 dome upgrade 2017 - 1.0

Well, it needed to be done, so I started re-looking at how to convert the R0 dome fitting/connection set-up, to match R5's which now sits on a rockler style bearing.

Going back through my photo's, I needed to remove the lower outer neck skin, as it was secured into place with pin nails. These go into the main connection ring which needs to be replaced with a thinner piece of wood to allow space for the bearing to sit up inside it.

And so it begins....
R0-D4
It is heartbreaking to have to destroy work you've done, and if the 'wobble' issue wasn't such an issue, this work wouldn't have needed to of been done. But the new set up is better and more stable. As you can see the panel pins go into the lower base ring. Also started to undo the screws that hold the skeleton uprights to the base ring, just seen upper right of the picture.

And after five minutes of praising and removing of the pins, the outer skin ring is off.
The internal 'groove' part of the neck detail is still in place. This was fitted to the skeleton uprights and also has fiber glass on the inside. The 'damaged' area is where it had some PVA glue on it to help with the outer (removed) ring.

This you can see better in the last picture below.......
R0-D4

Next up is to mark up, and cut out a new base ring, like how I did for R5's. Then its re-fixing time lol.

June 19, 2017

Fathers Day 2017

This year, this day, like every other year, I am just grateful for my kids being healthy & happy. I don't need cards etc to know that they love me, their smiles, hugs and kisses tell me this. They're asking me questions about life, Star Wars & me as a kid, show me this.

So when your youngest makes you a card at Brownies and really put thought into what I call her lol, that's something special. At first I thought, cool, collar and tie design......

Then I opened it up to read these words from her.....my little Padawan.....

Posted up on my Instagram feed too.

I'm not the easiest person to 'buy' stuff for lol, so this year I helped out by getting the wife a t-shirt I'd found on etsy for me, from the kids....
WOW......this version must now be classed as a limited edition lol, as colours available are only now 'white' & 'cream' options.... Check out 'uchiclothing' for these and more stuff.

(as with other links, I would just like to say that I'm not affiliated with the links I post, I just like giving them the respect, and helping to spread the word of work they do)

June 09, 2017

Jessika 'Testor' Pava - helmet - 2.3

With my daughters timely reminders that I've not done any work on her costume lol, I got back on to working on her helmet.

I've been reading but mostly watching since I started this project, You Tube videos of how to cast helmets and this multi-part tutorial has been invaluable source of info for a first timer, budget build attempt at casting a helmet.
Click on the picture to take you to his You Tube Channel
He stopped posting due to work commitments but as his viewing numbers show, he has been useful to others.

~~~~~~~~~~~~~

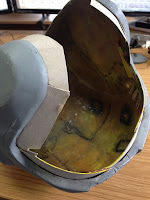
Here's the start of me applying cardboard around the edges.
the force awakens rebel pilotthe force awakens rebel pilot

I've also ordered some clay, and next will be to buy silicone tubes.
Am looking forward to this with each little step lol.

June 08, 2017

R5-D4 Trading cards 2017

Since my first post on my mini collection of R5-D4 trading cards,
I've found a few more.


This was my collection back on my first post back in 2014.

I wanted to find and collect (finances permitting) all the available trading cards which feature (and there aren't many) R5-D4, just as a fun thing to do.

I made up a stand, at the time as my collection was small.

But with the addition of a few more cards,
I'll need to think of a way to display them better.

Here are the new cards added to the collection:
NEW CARD 1
Interesting to note that both views of R5 show him with a round skirt.
Some of the body's did actually have round skirts,
but the 'standardised' flat sided skirts is usually the one
seen and even drawn up.
This can also be seen in the card red boarder card below.
(on my 'to get' list)

NEW CARD 2
This sparkly version is a newer of the plain standard 'grey background' card.
The back is also updated compared to the 'grey' pic version below

~~~~~~~~~~~ This one below, is still on my 'to get' list.

~~~~~~~~~~~

As mentioned in the previous post, another style of trading cards that have become more prominent, is the 'sketch card'. These are artist drawn ones that relate to the films characters. They're rare and hard to find tho, especially here in the UK!

Whilst searching this artist caught my attention, Marsha Parkins.
She created these cards for Topps for Rogue One.
These pics were from an eBay sale (not her's) that I was watching.....$125.00 US Dollars!!
Plus postage to the UK..... 

It's not R5-D4, but R5-SK1 who is red & white
and there aren't to many with this colour scheme,
so it's a nice connection
I'd like to add this one at some point......if possible.

June 05, 2017

Centre Leg - Film version **UPDATE 1.4**

So i got home from work Friday 26th and gave the components a lite sanding over the primer paint.

I then set up my hi tech spray booth........My cardboard box......and set up the components for spraying. After a few coats, I left them to dry. It has been very hot here in the UK the last few days, so it wouldn't take long to dry.
r5d4
new all white components
Saturday again the weather was fair, after a massive thunder storm early hours of the morning.
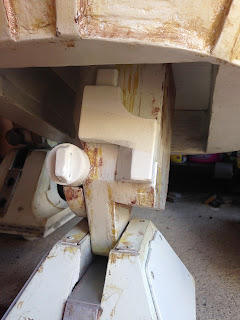
Out came my spray booth and i got on with clear coating the components. Again, these didn't take long to dry. A few hours later, I started to fit the components onto R5's centre leg and foot shell. They all fitted.
r5d4 centre leg

I dug out a tube of silicone sealant, but it had gone off at the ends. I cut it open to find the inside middle was still okay, so I scooped the good stuff out and used some to fix the front and rear ankle details onto the centre leg. Applied some masking tape to secure in place till it had set.
r5d4 centre leg
silicon applied to fix ankle details in place
r5d4 centre leg
ankle details taped into place till silicone set


r5d4 centre leg

r5d4 centre leg
The new centre leg & foot shell, pre-weathering

r5d4 centre leg
Rear ankle detail taped into place
Just back from a weeks mini-break..... Next up was to weather the new components to better blend in.